Setup Azure AD OAuth 2.0 with Ruby on Rails and Devise

Frantisek
My name is Frantisek and I am a committed engineer @PerAngusta. I came across multiple tutorials explaining how to setup an OAuth 2.0 connexion between Rails and Microsoft Azure AD.
They were all implementing pretty much the same. Unfortunately, none of them explained things deeply enough for a junior developer to understand. Thus, this article is a step-by-step guide of OAuth 2.0 authentication setup with Rails and Devise!
TLDR: there are two parts in this guide. For more technical explanation of what is OAuth 2.0 and how it works, scroll down to the end of the article

Part 1 — Setting up Azure AD

Of course, for this whole guide to work, you need a configured tenant in Azure AD. Then, let’s begin!
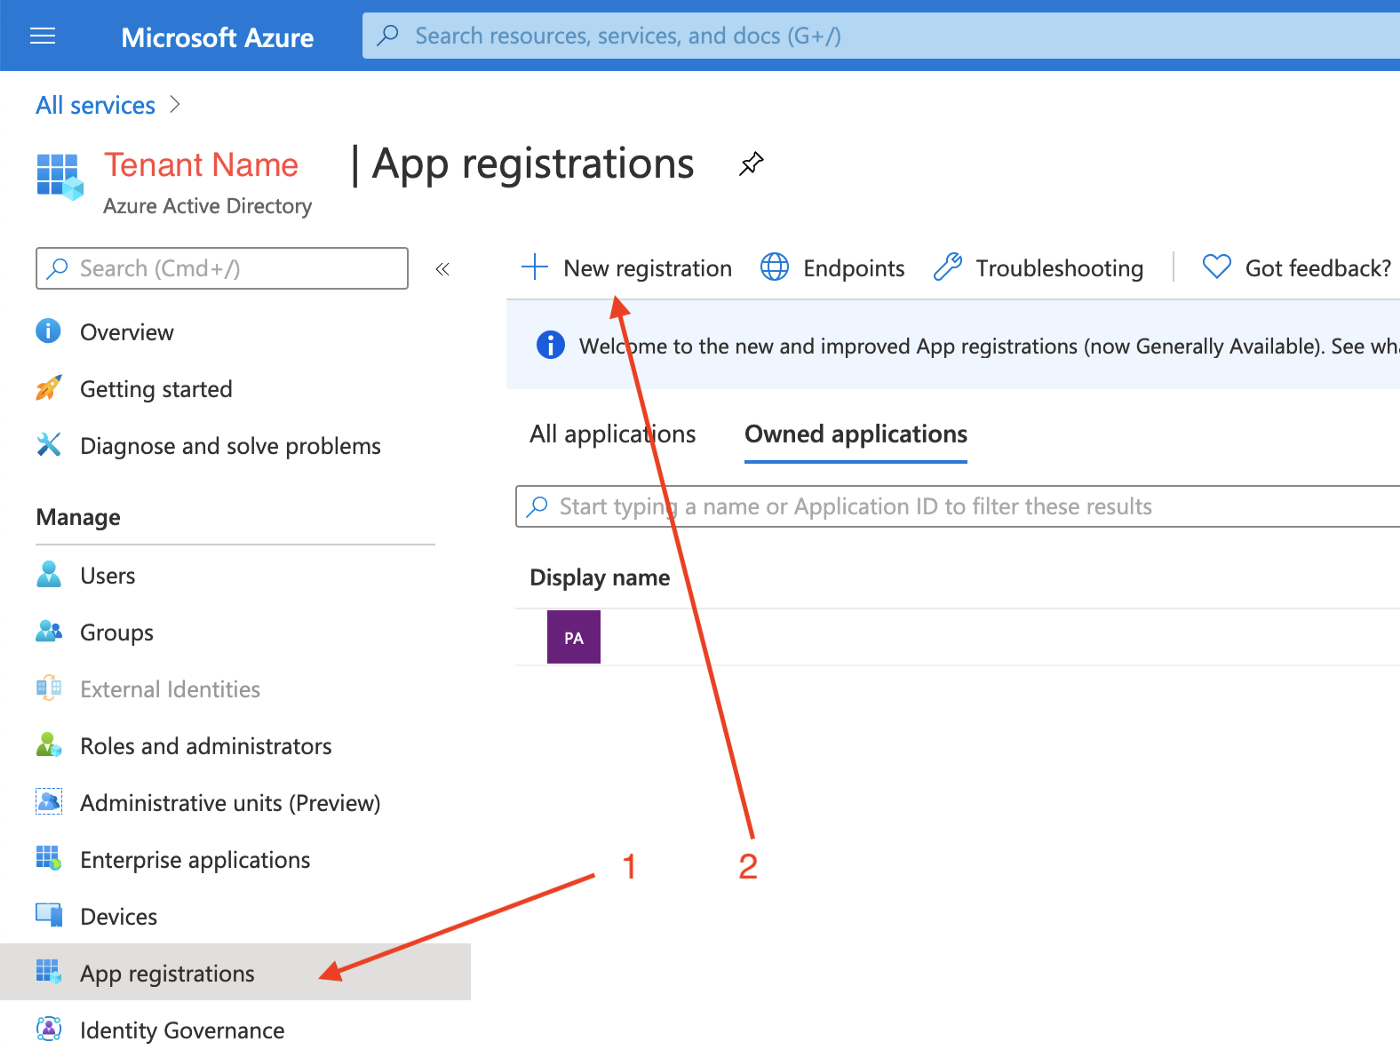
First of all we need to register a new app in your tenant Azure Active Directory For this go to your Azure portal and click on “App registration” and on “New registration”.
Then you may fill 3 things and click to Register:
- your Rails app name
- the Supported account types option to “Single tenant”
- Redirect URI to “Web” and
https://example.com/users/auth/azure_activedirectory_v2/callback
For localhost testing, you may use something like http://localhost:3000/users/auth/azure_activedirectory_v2/callback. The redirect URI importance will become crystal clear when Rails is set up.

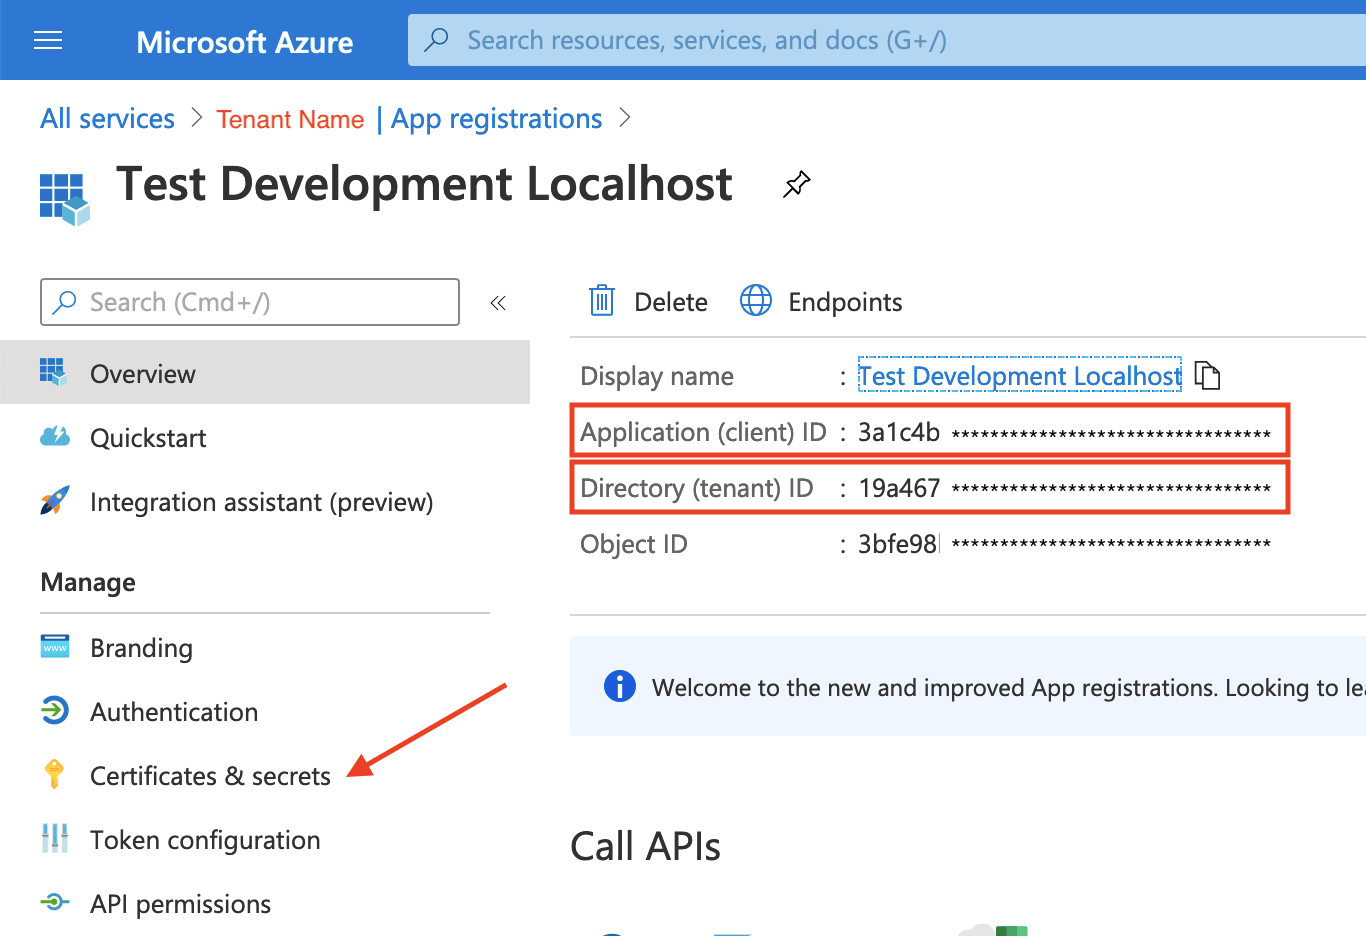
You app is now registered. Your app has been granted some IDs. Keep the Application (client) ID and Directory (tenant) ID somewhere safe! We will need it later on.
The last thing we need is to setup a secret-key for our app. For this, go to Certificates & secrets (obvious isn’t it?).
A secret string that the application uses to prove its identity when requesting a token.
Click on New client secret and follow the instructions. You only need to supply a Description and choose an expire strategy. For the latest, I would recommend to use the shortest period you can (here it is one year). Once it is generated you may copy it to clipboard or somewhere else. We will need it later too.
That’s it for Azure AD. 🚀
Part 2 — Setting up Rails
Now we can move to my Rails app and write some code! I suppose you have an app up and running. If you want to try this from scratch, feel free to use the Le Wagon template shipped with Devise.
First of all we need to add the gem we are going to use for this in the Gemfile and run bundle install .
EDIT: I have changed the gem because the original one seems not to be maintained anymore.
# Gemfile
gem 'omniauth-azure-activedirectory-v2'
Second we have to enable OmniAuth in Devise initialization and set it up on the User model.
Here we are going to use the 3 informations we have kept safe from the first part and add them all to the .env file using the correct syntax.
# config/initializers/devise.rb
Devise.setup do |config|
  # Add this line
  config.omniauth :azure_activedirectory_v2,
                  client_id:     ENV['AZURE_CLIENT_ID'],
                  client_secret: ENV['AZURE_CLIENT_SECRET'],
                  tenant_id:     ENV['AZURE_TENANT_ID']
end

# app/models/user.rb
class User < ApplicationRecord
  # Add this line
  devise :omniauthable, omniauth_providers: %i[azure_activedirectory_v2]

  # ...
end
Third, we need to enable routes for devise OmniAuth functionality. That is where the Redirect URI gets created.
# config/routes.rb
Rails.application.routes.draw do
  # ...
  devise_for :users,
             controllers: {
               sessions:           'users/sessions',
               omniauth_callbacks: 'users/omniauth_callbacks'
             }
end
Now the routes are created, we implement a button in the frontend that triggers the new devise OmniAuth authorization API. It can be as simple as:
# config/routes.rb
<%= link_to "Log in with Azure AD",
            user_azure_activedirectory_v2_omniauth_authorize_path,
            class: 'btn btn-outline-primary btn-lg btn-block' %>
Fifth, we have to create the controller to which the response is going be sent. If you do not have it yet, you should create it.
# app/controllers/users/omniauth_callbacks_controller.rb
class Users::OmniauthCallbacksController < Devise::OmniauthCallbacksController
  def azure_activedirectory_v2
    response_params = request.env['omniauth.auth']['info']
    @user = User.find_by!(email: response_params['email'])

    if @user&.persisted?
      sign_in_and_redirect @user, event: :authentication
    else
      flash[:danger] = 'You have not yet an account!'
      redirect_back(fallback_location: root_path)
    end
  end
end
Finally, we can test it and enjoy! 🚀
What the hell is OAuth 2.0?
OAuth 2.0 is the industry-standard protocol for authorization. OAuth 2.0 focuses on client developer simplicity while providing specific authorization flows for web applications, desktop applications, mobile phones, and living room devices.
Surprisingly, I have found the Microsoft documentation clear enough to understand. 😆 If you want to see a neat explanation about OAuth 2.0, check out this brilliant talk given by Halil at Lyon.rb (only in 🇫🇷 sorry)! Halil is one of our former interns @PerAngusta.
Feel free to join our Ruby community! We would be happy to meet you at our next meet-up, talking about Ruby and more!
Setup I have implemented it with:
ruby -> 2.6.5
rails -> 6.0.3.2
devise -> 4.2
omniauth-azure-activedirectory-v2  -> 1.0.0